
- Home
- Making a start
- Design & Planning
- Windows & Rooflights
- Insulation & Flooring
- Furniture
- Beds & Seats
- Kitchen
- Washroom
- Electrics
- Gas
- Water
- Heating
- Lighting
- Security
- Accessories
- Sources & Suppliers
- Cost Guide
- Specification
- Tools-Materials-Methods
- About Us
- Gallery

Mileage travelled:


Site News
Washroom

When we began the conversion we were determined to have a decent size washroom with a shower area and spent a lot of time considering layouts to try to maximise the space we allotted.
In the end we chose a Thetford swivel bowl toilet and fitted it alongside the wheel arch, this left a useful area of floor space for a shower tray.
By fitting the toilet so the cassette could be removed through the side partition meant we could have the wardrobe/store cupboard located at the back; this made access to items like chairs and wheel wedges much easier.
We could not decide on the type of wash basin and the best location to fit it, so, as a temporary solution, we installed a tiny corner basin. Meanwhile we could use the van and get a feel for what might, or might not, work. And it did... for five years!
New Version
Whilst the Thetford toilet worked well we found, as we are getting older, that carrying the cassette any distance was becoming a struggle. We could have bought one of the popular fold-up trolleys with wheels that folks use to carry the cassette, but there was no space to store any more bulky items.
Of course one can always drive the van to the chemical disposal point to save having to lug the cassette, but once we've got the awning out and set up camp for a few days, the last thing one wants to do is move the van.
So we have changed to the Dometic CTW 4110 swivel-bowl toilet which has a cassette with wheels and pull-out handle. It also has slightly greater capacity at 19 litres. The bowl has a ceramic lining which should make stain removal a little easier (oh, the luxury of it all!).

The new layout is shown in the sketch.
Unfortunately, the Dometic toilet will not work in the same position as before. Whilst it will just about fit, it is impossible to operate the bowl sliding valve (the handle at the front) as it is impeded by the dreaded wheel arch. So we have had to fit the toilet against the rear partition to allow the cassette to be removed. This meant new side and wardrobe partitions have to be made and the wardrobe moved to the front.
As we dislike caravan-type plastic wash basins, and their tiny basin plugs that never stay in place, we've chosen a small ceramic countertop basin. There is a weight penalty, but we can afford to add a little as we have plenty of payload left. We have found a suitable tap, but it is a 'domestic' type and has pipe connections to suit 15mm copper. The basin uses the standard 1 1/4 inch waste fitting, so we'll have to give some thought how to connect this lot to the existing pipework.
What we can't change is the position of the window (originally we chose a window instead of a rooflight for the washroom to keep the roof area clear for solar panels), fortunately its position is not a problem.
Construction

This is 'work in progress' so still a lot left to do.
The new wardrobe and washroom before fitting the doors.
The long side is a single frame and was made in the shed; it just about goes in through the rear doors at an angle.
By making the long partition in one piece avoids having to use fixing screws into the ceiling. We try not to use the ceiling as:
a) it does not provide a very strong base,
b) if we wish to make changes, no redundant screw holes are left visible in the ceiling.
The frame fixes to the end partitions, to the wardrobe partition, and to the floor; all with screws fitted in prepared holes.
The front, side, and rear partitions are simple 44x18mm softwood frames with half-lap joints and 4mm cherry-veneered ply fixed with impact adhesive on one side.

The old washroom/wardrobe before the changes. Although making some drastic alterations, we have managed to keep the front and rear end partitions. The rear will need openings cut in it for the toilet cassette and filler - not a nice job as this panel is lovely real veneer and one doesn't want to make a mistake and ruin it!

New washroom with cassette door in rear panel. The end panel was originally made in two sections as it was the last section to be fitted; at the time we thought it would be easier to install and make access to the van rear light cluster easier.
As the panel was fixed to the wall battens, floor, and long side frame with screws, it was a simple job to remove it and do the changes in the shed.
Cutting openings for the toilet cassette and filler


Although the Dometic toilet was supplied with a cardboard template showing the locations of the cassette and filler openings (it was printed on the outer packaging), we found it easier to make our own template and take measurements directly from the toilet.

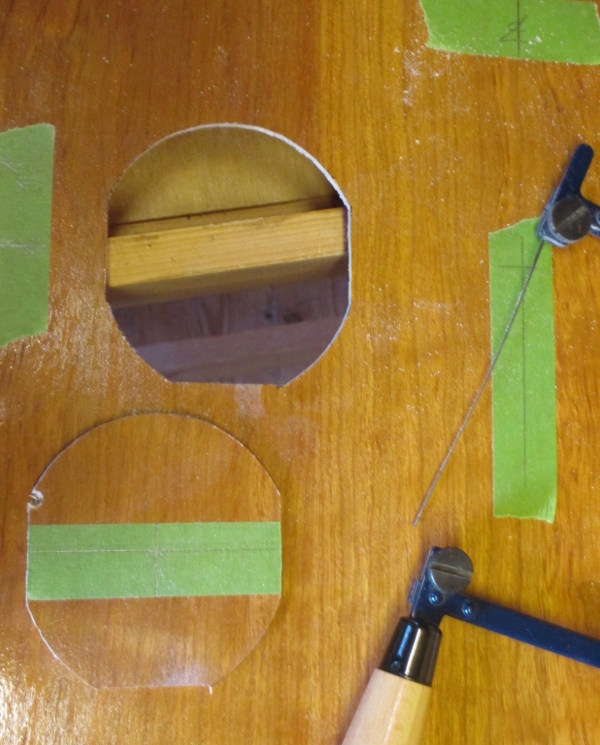
We used a piercing saw to cut the filler hole after first drilling a small 'starter' hole.
The saw blade has to be detached from one end of the saw frame, poked through the hole, then refitted on the saw - a tricky job! These saw blades are very fine and break easily, but do give a nice clean cut edge.


For the rectangular cassette opening we used a pad saw to start the cut after drilling a small hole in each corner, then used a tenon saw to finish off.
Just a door to make now to cover the cassette opening.
Note the end wall is spaced about 100mm inwards from the van rear door. This was done as it would have been impossible to operate the opening handle on the inside of the van's offside rear door if the partition was fixed at the very back of the van floor.

The Dometic CTW 4110 swivel-bowl toilet. This version has a flush water holding tank and uses an integral 12 volt electric pump for the flush.
Plan is to finish off internal walls with plain 3.5mm ply, then 2mm UPVC sheet on top to provide hygenic and waterproof covering.
Making the new washroom internal partition
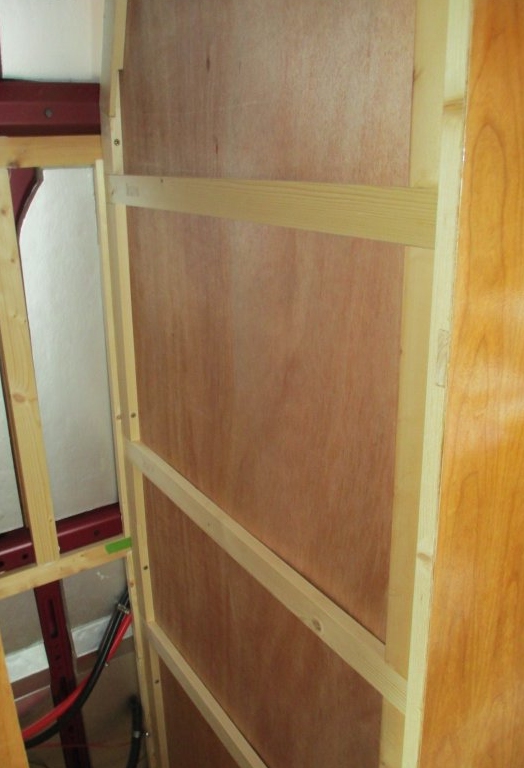


A new wardrobe/washroom wall partition had to be made. This frame fits against the van wall on one side, so some careful measuring and cutting is required as the van wall slopes in two places. Plain 4mm ply is screwed on one side. Quite a few half-lap joints have to be cut; these are best done on a solid bench in the shed (with the heater turned up when it's mid-January!).

Framework around the insulated wheel arch is 44x18mm softwood with half-lap joints and plain 4mm ply covering.
Some of the vertical timber on the wall is redundant from the old wardrobe fixing, it wasn't worth trying to remove it as it is stuck down well with Sikaflex.
Making the vanity unit

The vanity cupboard top being laminated. We used the same Formica laminate and technique to glue it down as used on the kitchen worktop (see Kitchen Section for more info); a plain white 'balancing' veneer was glued underneath to prevent warping.
It is a tricky job cutting laminate edging strips, and fixing them around tight curves, as this laminate will shatter (like a biscuit does) without warning if stressed too much. Oh, what fun!
Bosch hole cutters mounted on an arbour in a mains portable drill were used to cut the holes for the sink and tap.

The top is supported along its back edge and by a framework at each end.
We originally made the top from one piece of 12mm ply, but this immediately developed a bad warp as soon as it was cut out from a larger sheet (due, we think, from stress caused by dissimilar woods used for the plies during manufacture ), so that had to be scrapped and a new one made - this time with two layers of 12mm ply glued at 90 degrees to each other - to try to avoid any warps developing. This does make the top heavy, but it has stayed flat (so far!).

Rather than just panel over the whole wheel arch and the 'redundant' area in the corner, we've made a small ply divider to form a useful locker for toilet chemicals etc. It'll have a lid eventually. They'll be shallow cupboards below the top too - it all takes time...
Fitting the basin and tap

The ceramic countertop basin and mixer tap temporarily placed in position to work out the pipe runs. These are 'domestic' items and not from caravan/motorhome suppliers. The basin is 12 inches diameter and uses the usual 1 1/4 inch waste outlet with overflow.
This type of basin is usually stuck down on a vanity unit top with adhesive/sealant, such as 'Stixall' or Sikaflex. The waste fitting nut is designed to tighten on the underside of the basin and a large hole is usually cut in the vanity unit top to clear the nut.

Although we were happy to stick the basin down with Sikaflex, we rather wanted some additional 'mechanical' security - unlike a wash basin in a house bathroom that never moves, a motorhome gets bounced about a great deal!
Instead of a clearance hole in the top to clear the nut we have drilled a 40mm dia. hole - the diameter of the waste fitting thread - and managed to extend the upper part of the waste fitting body through the top, leaving about 20mm of thread underneath. Onto this is fitted the lower part of a Grohe brass waste fitting (that we had spare from a house project) - this fitting has an excellent thread and provides a good extra fixing.
There is a potential problem with basins that have an overflow feature if one extends the waste fitting through the top as described. In short, water can flow into the hole in the vanity top and ruin it if it has not been sealed. To overcome this we decided to do away with the basin overflow (we are unlikely to leave a tap running), so have filled the basin holes with sealant.

As the basin waste is standard 1 1/4 inch pipe, we used an adaptor (from CAK Tanks) to connect to our existing 3/4 inch flexible waste pipe. It would be great if were able to run 1 1/4 inch pipe all the way to the waste tank, but we just don't have the space. However, an advantage with 3/4 inch flexible waste pipe is there are no joints between the sink and the underfloor tank to cause leaks.
The 3/4 waste drains quickly enough, particularly with the larger plug hole!
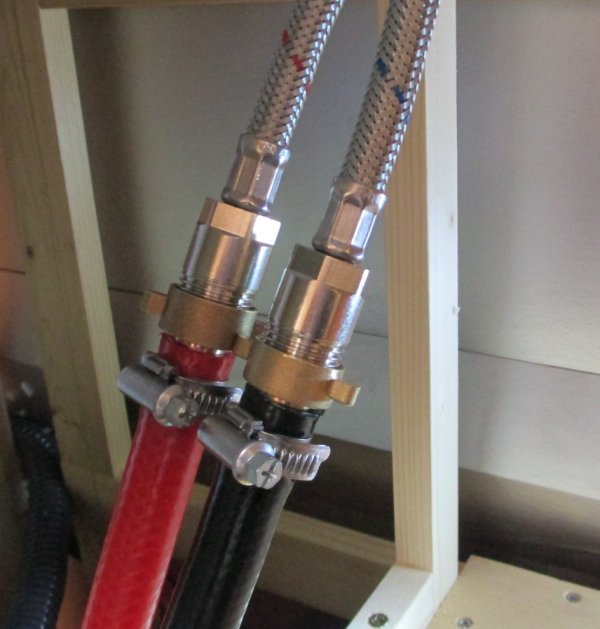
The CDA ceramic mixer tap is supplied with two long flexible pipe tails terminated with one-way valves. To connect to our 1/2 inch flexible water pipes we used hose-type tap connectors.

"A picture is worth a thousand words...."